How To Rearrange Pages In Microsoft Word

Rearranging pages in Microsoft Word can be a useful skill to have, especially when it comes to organizing lengthy documents or making edits to existing files. Did you know that with just a few simple steps, you can easily change the order of pages in your document, ensuring that your content flows seamlessly and logically? Whether you're working on a report, a thesis, or a presentation, being able to rearrange pages in Microsoft Word can save you time and effort in the long run.
When it comes to rearranging pages in Microsoft Word, there are a few key techniques to keep in mind. Firstly, you can use the "Page Navigation" pane to easily move pages within your document. Simply navigate to the desired page, click and drag it to the desired location, and release the mouse button. Secondly, you can utilize the "Cut" and "Paste" commands to move pages. Select the entire contents of the page you want to move, cut it, navigate to the new location, and paste the contents. Finally, you can also use the "Thumbnail" view to visually rearrange pages by dragging and dropping them to your desired positions. With these techniques at your disposal, you can rearrange pages in Microsoft Word efficiently and effectively, optimizing your document's structure and flow.
If you want to rearrange pages in Microsoft Word, follow these steps:
- Open your Word document.
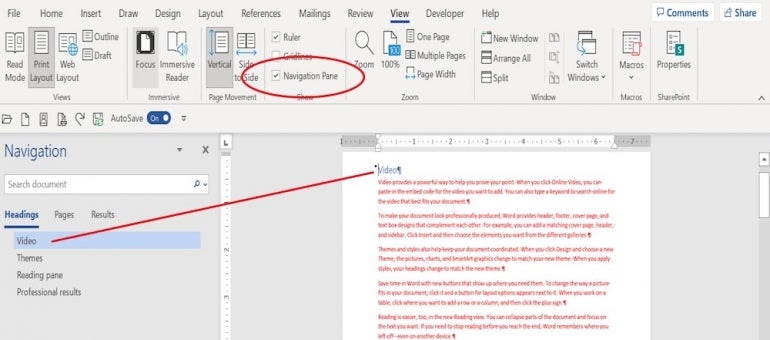
- Click on the "View" tab in the menu.
- Go to the "Navigation Pane" option and click on it to open it.
- In the Navigation Pane, click on the "Headings" tab.
- Drag and drop the headings of the pages you want to rearrange.
- Save your document.

Understanding the Importance of Rearranging Pages in Microsoft Word
Microsoft Word is a powerful word-processing software that allows users to create, edit, and format documents. One important aspect of document creation is the ability to rearrange pages. Rearranging pages in Microsoft Word can be useful in various scenarios, such as organizing content, creating a table of contents, or preparing documents for printing. Knowing how to rearrange pages effectively can enhance productivity and streamline the document creation process. In this article, we will explore different methods and techniques for rearranging pages in Microsoft Word.
Method 1: Using the Navigation Pane
The Navigation Pane in Microsoft Word provides a quick and convenient way to rearrange pages within a document. Follow these steps to utilize this method:
- Open your document in Microsoft Word.
- Click on the "View" tab in the Ribbon.
- Check the box next to "Navigation Pane" in the "Show" group. The Navigation Pane will appear on the left side of the document.
- Click on the "Pages" tab in the Navigation Pane.
- Drag and drop the pages to rearrange them in the desired order.
Using the Navigation Pane provides a visual representation of your document's structure, allowing you to easily move pages around by simply dragging and dropping them. This method is particularly useful when working with longer documents or when you need to rearrange multiple pages at once.
Pros of Using the Navigation Pane:
- Provides a visual representation of the document structure.
- Enables easy rearrangement of multiple pages at once.
- Allows for intuitive drag-and-drop functionality.
Cons of Using the Navigation Pane:
- Requires the Navigation Pane to be enabled.
- May not be suitable for users who prefer a different workflow.
While the Navigation Pane method offers convenience and efficiency, it may not be suitable for users who prefer a different workflow or need to rearrange pages in a specific manner that is not easily achieved through drag-and-drop.
Method 2: Using the Insert Breaks Feature
An alternative method for rearranging pages in Microsoft Word is by utilizing the "Insert Breaks" feature. This feature allows you to insert various types of breaks in your document, such as page breaks or section breaks, effectively creating multiple sections within your document. Follow these steps to rearrange pages using this method:
- Open your document in Microsoft Word.
- Place the cursor at the beginning of the page you want to move.
- Click on the "Layout" tab in the Ribbon.
- Click on the "Breaks" button in the "Page Setup" group.
- Select the desired break type (e.g., "Page" or "Section") from the drop-down menu. This will create a break at the cursor position.
- Repeat the above steps for the page you want to move the content to.
- Select the content you want to move by highlighting it.
- Click on the "Cut" button in the "Clipboard" group on the "Home" tab or press "Ctrl + X" to cut the content.
- Place the cursor on the page where you want to move the content.
- Click on the "Paste" button in the "Clipboard" group on the "Home" tab or press "Ctrl + V" to paste the content.
The Insert Breaks method allows you to create breaks at specific positions in your document, effectively separating content into different sections. By cutting and pasting the content between pages with different breaks, you can rearrange pages easily. This method is particularly useful when you need to maintain different formatting or headers and footers for each section of your document.
Pros of Using the Insert Breaks Feature:
- Provides control over document sections and formatting.
- Allows for precise placement of page breaks.
- Useful for maintaining separate headers and footers for different sections.
Cons of Using the Insert Breaks Feature:
- May require additional formatting adjustments.
- Requires cutting and pasting content between pages.
While the Insert Breaks method provides control over document sections and formatting, it may require additional formatting adjustments and involve the cutting and pasting of content between pages. This method is ideal when you need to rearrange pages while maintaining different sections within your document.
Method 3: Using Copy and Paste
If you prefer a more straightforward approach, you can use the copy and paste method to rearrange pages in Microsoft Word. Follow these steps:
- Open your document in Microsoft Word.
- Select the content you want to move by highlighting it.
- Click on the "Cut" button in the "Clipboard" group on the "Home" tab or press "Ctrl + X" to cut the content.
- Place the cursor on the page where you want to move the content.
- Click on the "Paste" button in the "Clipboard" group on the "Home" tab or press "Ctrl + V" to paste the content.
The copy and paste method is the most straightforward way to rearrange pages in Microsoft Word. It allows you to quickly move content from one page to another without the need for additional formatting adjustments. However, it is essential to ensure that the formatting of the pasted content matches the target page to maintain a consistent document appearance.
Pros of Using the Copy and Paste Method:
- Simple and straightforward method.
- Does not require additional formatting adjustments.
- Allows for quick rearrangement of content.
Cons of Using the Copy and Paste Method:
- Requires careful matching of formatting between source and target pages.
- Possible loss of formatting if not matched correctly.
While the copy and paste method offers simplicity and convenience, it is crucial to ensure that the formatting of the pasted content matches the target page. Failure to do so may result in the loss of formatting or inconsistencies within your document.
Method 4: Using the "Organize" Feature
Microsoft Word also provides an "Organize" feature that allows you to rearrange pages within a document easily. Follow these steps to utilize this method:
- Open your document in Microsoft Word.
- Click on the "File" tab in the Ribbon.
- Click on "Options" to open the Word Options dialog box.
- Click on "Advanced" in the sidebar.
- Scroll down to the "Show document content" section.
- Check the box next to "Allow editing directly in the page margin" and click "OK" to save the changes.
- Click on the page margin area of the page you want to move and drag it to the desired position.
By enabling the "Allow editing directly in the page margin" option, you can easily click and drag pages within your document, effectively rearranging them. This method offers flexibility and simplicity, allowing you to visualize the page layout and reposition pages at your convenience.
Pros of Using the "Organize" Feature:
- Offers a visual representation of the document layout.
- Allows for easy click-and-drag rearrangement of pages.
- Provides flexibility in adjusting page layout.
Cons of Using the "Organize" Feature:
- Requires enabling the "Allow editing directly in the page margin" option.
- May not be suitable for users who prefer a different workflow.
While the "Organize" feature offers visual representation and flexibility in rearranging pages, it may not be suitable for users who prefer a different workflow or need to rearrange pages in a specific manner that is not easily achieved through click and drag.
Exploring Advanced Techniques for Rearranging Pages in Microsoft Word
In addition to the methods mentioned above, Microsoft Word offers various advanced techniques to further enhance your page rearrangement capabilities. These techniques include:
Using the "Outline View" Feature
The "Outline View" feature in Microsoft Word allows you to view and rearrange the structure of your document. By utilizing the different levels of headings, you can easily move entire sections or subsections within your document. To access the "Outline View" feature:
- Open your document in Microsoft Word.
- Click on the "View" tab in the Ribbon.
- Click on the "Outline" button in the "Document Views" group.
- In the "Outline" view, use the arrow buttons to rearrange sections or subsections within your document.
The "Outline View" provides a hierarchical representation of the headings in your document, allowing you to easily move entire sections or subsections by clicking and dragging on the arrow buttons. This method is particularly useful for documents with complex structures, such as reports or research papers.
Utilizing Macros
Macros are a powerful automation tool in Microsoft Word that allows you to record a series of actions and replay them with a single click. By creating a macro to rearrange pages, you can save time and streamline your workflow. To create a macro for rearranging pages:
- Open your document in Microsoft Word.
- Press "Alt + F11" to open the Visual Basic for Applications (VBA) editor.
- Click on "Insert" in the menu bar and select "Module." This will insert a new module into the VBA editor.
- Write the VBA code to rearrange the pages. For example, you can use the "Move" method to move a specific page before or after another page.
- Close the VBA editor.
- Press "Alt + F8" to open the "Macro" dialog box.
- Select the macro you created and click "Run" to execute the code and rearrange the pages.
Macros provide a customizable solution for rearranging pages in Microsoft Word. By recording your desired actions and creating a macro, you can easily repeat the process with a single click, saving you valuable time and effort.
Using Table of Contents and Bookmarks
The "Table of Contents" and "Bookmark" features in Microsoft Word can also be utilized to rearrange pages within your document. By updating the table of contents or modifying bookmarks, you can effectively adjust the order of pages. Here's how to use these features:
- Open your document in Microsoft Word.
- Click on the "References" tab in the Ribbon.
- Click on the "Table of Contents" button in the "Table of Contents" group.
- Select the desired table of contents format or click on "Custom Table of Contents" to customize the appearance.
- Click on the table of contents to select it.
- Click on the "Update Table" button in the "Table of Contents" group to update the table of contents according to your document structure.
- To rearrange pages, modify the headings or bookmarks in your document. These changes will be reflected in the table of contents.
By manipulating the headings or bookmarks in your document, you can effectively adjust the order of the pages listed in the table of contents. This method is especially useful when working with lengthy documents or wanting to create a specific page sequence.
Pros of Using the "Table of Contents" and "Bookmark" Features:
- Allows for customization and control over the table of contents appearance.
- Enables adjustment of page order by modifying headings or bookmarks.
- Useful for creating a specific page sequence or organizing lengthy documents.
Cons of Using the "Table of Contents
Steps to Rearrange Pages in Microsoft Word
Microsoft Word provides an easy way to rearrange pages within a document. Follow these steps:
- Select the page you want to move by clicking on the page number in the navigation pane.
- Right-click on the selected page and choose "Cut".
- Place the cursor at the location within the document where you want to move the page.
- Right-click and select "Paste". The page will be inserted at the desired location.
If you prefer using keyboard shortcuts, you can also use the "Ctrl+X" combination to cut the page and "Ctrl+V" to paste it in the desired location.
Additionally, you can use the "Drag and Drop" method to rearrange pages:
- In the navigation pane, click and hold the page thumbnail you want to move.
- Drag the page to the desired location within the document.
- Release the mouse button to drop the page in its new position.
Following these simple steps, you can easily rearrange the pages in your Microsoft Word document. This feature is particularly useful when organizing large documents or when you need to reorder sections to enhance readability.
Key Takeaways - How to Rearrange Pages in Microsoft Word
- Pages can be rearranged in Microsoft Word by using the Navigation Pane.
- To rearrange a page, simply click and drag it to the desired location in the document.
- Rearranging pages is useful when organizing a document or when merging multiple documents together.
- Microsoft Word also provides the option to cut and paste pages to rearrange them.
- It is important to save your document after rearranging pages to ensure changes are applied.
Frequently Asked Questions
When working with a document in Microsoft Word, you may need to rearrange the pages for better organization or to meet specific requirements. Here are some commonly asked questions about how to rearrange pages in Microsoft Word.
1. Can I rearrange pages within the same document?
Yes, you can easily rearrange pages within the same document in Microsoft Word. To do this:
a) Select the page or pages you want to move by clicking and dragging over the page numbers in the navigation pane on the left side of the Word window.
b) Once the pages are selected, click on the "Cut" option from the "Home" tab or right-click and select "Cut."
c) Place the cursor at the desired location within the document and click on the "Paste" option from the "Home" tab or right-click and select "Paste."
2. How can I move pages to a different document?
If you want to move pages to a different document in Microsoft Word, follow these steps:
a) Open both the source document (the one with the pages you want to move) and the target document (the one where you want to move the pages). Arrange the two documents side by side.
b) In the source document, select the page or pages you want to move by clicking and dragging over the page numbers in the navigation pane.
c) Once the pages are selected, click on the "Cut" option from the "Home" tab or right-click and select "Cut."
d) Switch to the target document, place the cursor at the desired location, and click on the "Paste" option from the "Home" tab or right-click and select "Paste."
3. Is it possible to duplicate a page in Microsoft Word?
Yes, you can duplicate a page in Microsoft Word by following these steps:
a) Select the entire content of the page you want to duplicate by clicking and dragging over it.
b) Copy the selected content by clicking on the "Copy" option from the "Home" tab or right-clicking and selecting "Copy."
c) Place the cursor at the desired location within the document and click on the "Paste" option from the "Home" tab or right-click and select "Paste."
4. Can I rearrange pages in a different order, such as reversing their sequence?
Absolutely! To rearrange pages in a different order, including reversing their sequence, you can:
a) Select the page or pages you want to move by clicking and dragging over the page numbers in the navigation pane.
b) Once the pages are selected, click on the "Cut" option from the "Home" tab or right-click and select "Cut."
c) Place the cursor at the desired location within the document and click on the "Paste" option from the "Home" tab or right-click and select "Paste." This will reverse the sequence of the pages.
5. How can I rearrange pages using the thumbnail view?
In Microsoft Word, you can rearrange pages using the thumbnail view for a visual representation of the pages. Follow these steps:
a) Click on the "View" tab in the Word ribbon.
b) In the "Views" section, click on "Thumbnails."
c) In the thumbnail view, click and drag the pages to the desired position.
To sum up, rearranging pages in Microsoft Word is a simple process that can greatly enhance the organization and flow of your documents. By following a few easy steps, you can easily move and reposition pages to create a more logical and cohesive structure. First, select the page or pages you want to move by clicking and dragging your cursor over the desired content. Then, use the "Cut" or "Copy" function to remove the selected pages from their current location. Finally, navigate to the desired location within your document and use the "Paste" function to insert the pages in their new position. Not only does rearranging pages help improve the overall structure of your document, but it also allows for easier editing and revision. Whether you're working on a lengthy report or a creative writing piece, being able to seamlessly rearrange pages can save you time and effort in the long run. So why not give it a try? Start rearranging your pages in Microsoft Word today and experience the benefits of a more organized and cohesive document.


